Lasergravure was the product that I was recruited to Crosfield Electronics to work on. At the time, it was going to revolutionise the printing industry, helping gravure to hold back the advances of offset printing. As we now know, it never made it to production, and the investment was written off. For those who worked on it, however, it was a fascinating project, involving a wide range of skills and some real engineering. The most unusual aspect, though, to my mind, was the wide range of hazards that the development team were exposed to.
Gravure is one of two processes normally used for long-run commercial printing, that's magazines, packaging labels, advertising leaflets and the like; the other being offset. Gravure is simpler in concept and older, and was generally thought superior for very long runs, a million or more copies, and for very high quality colour. Offset, the younger upstart, was originally suitable only for low-quality work, but developed rapidly, as it has the advantages of less labour-intensive preparation and fewer chemical pollution problems. It was these two advantages that Lasergravure was going to give back to gravure.
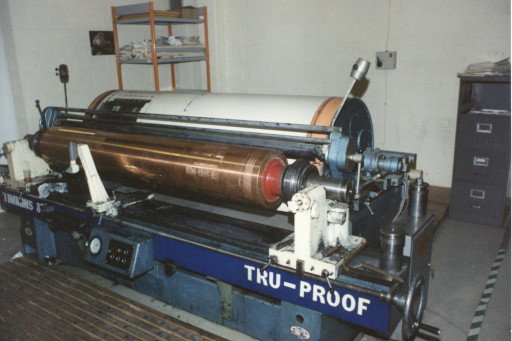
In printing, three components are essential: ink, paper, and a representation of the image to be printed, called a printing plate or forme. For gravure, the plate is etched so that over the area that is to result in ink on paper there are lots of small pits, and the rest of the area is smooth. For each copy, first the whole plate is inked, then the ink is scraped off the flat surface with a thin, springy metal blade, called a doctor blade, leaving ink just in the pits. Then, when the plate is pressed hard against the paper, the ink is drawn out of the pits and marks the paper. The pits are small enough that they do not show to the eye, and on the paper the ink tends to flow out a little as well. In a high-speed press, the plate is not flat, but is the outer surface of a cylinder. Each rotation of the cylinder takes the surface in turn through the ink bath, past the doctor blade, and onto the paper. A typical cylinder might be a couple of metres long, have a circumference of about a metre, weigh about a tonne, and print twenty-four A4 pages for each turn.
 |
| A typical gravure cylinder mounted on a manual proofing press |
Apart from the rather nasty organic solvents used in the inks, the press itself presents few problems. It is in the preparation of the cylinders that the problems occur. Though the cylinders are basically steel, they are coated with a thin layer of copper, and it is in this copper that the pits are made. In the "classical" process, which I have never seen in action, the image to be printed is prepared as a photographic film at the final size, complete with the pattern of pits required. This image is then transfered to the surface of the cylinder using a photo-resist, which is applied as a liquid onto the surface or dry-applied by a transfer system, and then exposed to ultra-violet light. When the resist is developed, the pits may then be etched using acid or ferric chloride, in exactly the same way as printed circuit boards are made.
Once a cylinder has completed its printing job, the surface may be turned down on a lathe and re-polished to get a new, clean surface. After a few cycles of this, the copper is too thin and must be built up again by electro-plating, involving more nasty chemicals, typically cyanides.
Most modern printers no longer use the chemical etch process, though they still need the re-plating process. The etching has been replaced by a machine, made by our rival, Hell of Germany, called the Klischograph. This incredible machine pecks out the pits in the copper surface using a vibrating diamond stylus, or rather up to twelve styli to get the speed up. The image data is supplied electronically to the vibrators, so that the photographic stage is simplified too.
Lasergravure had the same advantages of operating directly from electronic data, and of avoiding the chemical etch process, but also eliminated the copper processing. The printing surface was no longer metal, but a layer of special plastic material, and the pits were made simply by vapourising the plastic using a tightly-focused, high-power laser.
Now the main components of the Lasergravure system become clear. There is a system to coat gravure cylinders with plastic, another to engrave the pits, and a third to take the plastic off afterwards. The machines that turn the cylinders to the exact size and polish the surface, and the press itself, remain the same.
The problems begin at the beginning. The plastic was supplied as a fine powder, which was applied to the cylinder using an electostatically assisted spray. This process, especially in the early experimental stages with simple equipment, could be messy. The powder was also carcinogenic. The early powders were black, as, before long, was the room where the spraying was done - it was christened, inevitably, the "Black Hole". Later powders were white, but still carcinogenic.
After the powder had been applied, it had to be melted into a liquid which would coat the surface, and then cured. Originally done by infra-red heating, this was fairly innocuous; except that the temperatures were high and the cylinders took a long time to cool. A later machine, which used induction heating, was more interesting. The current was so high that the cables had to be water cooled, and the transformer that supplied it was about a metre cube. It had a control knob about the size of a car steering wheel, and looked like something out of a horror film.
Once the coating was cured, and the cylinder turned to size and polished, it could be engraved. Among hazards, the engraver was a gem.
Consider the cylinders, at around a tonne for the big ones; even the little ones couldn't just be picked up and put onto the engraver. They had to be wheeled around on special trolleys (called "gun carriages") and lifted with overhead electric cranes. To fit one onto the engraver, you had to wheel it within range of the crane, arrange the appropriate coloured slings (colour-coded for the weight, remembering to allow for the multipliers if the slings were working at an angle) around the cylinder, attach to the hook, and lift carefully, checking that the slings weren't slipping and that the cylinder was level, then drive the crane over the engraver and carefully start to lower. When it was level with the bearings, you carefully fed one end of its shaft into the headstock bearing, taking care not to jam it and damage the bearing. Setting the cylinder exactly level, using just short jabs on the crane controls, you then cranked the tailstock bearing over the other end of the cylinder shaft and pushed it right home into the headstock. All that remained was to lower the crane, remove the slings, and tighten the collets using a couple of huge C-spanners and a large copper-faced hammer. Steel toe-capped shoes were standard issue.
The bearing and collets had to be strong, because to burn all of that huge number of small pits into the cylinder, using only one laser, in a reasonable time (about twenty minutes), the cylinder had to spin at around 1000 revolutions per minute. A twenty horse-power motor was needed for this.
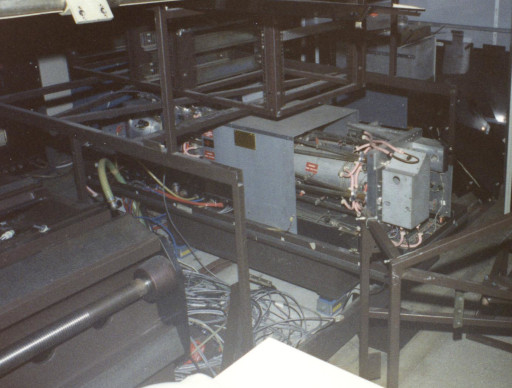
The heart of the engraver was a 400-watt carbon dioxide laser. This sort of laser gives out an invisible infra-red beam. You can't see the beam, but if it hits you, you certainly can feel it. It can burn holes in bricks. In the original laboratory, where the beam occasionally got lost, it burnt a hole in the wall. In development, you often lost the beam; to find it, the standard technique was to take a piece of paper and wave it about where you thought the beam might be, when it glowed or caught fire, you'd found it.
 |
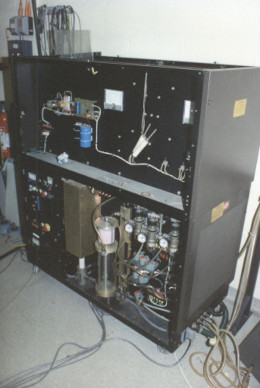 |
| The laser, seen as the last machine was stripped | The laser power & control unit |
As a small side-issue, one of the gases in the exhaust of a carbon dioxide laser is the poisonous carbon monoxide.
The laser was powered by a fearsome-looking power cabinet. And fearsome it was, as the laser needed about 12000 volts at half an amp, the sort of supply that kills, no questions. To make matters worse, it had a couple of huge reservoir capacitors that could store a lethal charge long after the three-phase mains input had been disconnected. I once got a shock off this thing, with the power off and the capacitors out of circuit, just from the charge stored in the capacitance of the wiring. It leapt several millimetres to my finger, and I heard it as well as felt it. The plus side was that the laser emitted a cute blue to pink light as it worked, depending on the gas mix.
Food for the laser was a mixture of carbon-dioxide, helium and nitrogen, supplied in high-pressure gas bottles. So, another part of being an electronic engineer on Lasergravure was wheeling gas bottles back and forth from the bottle store, and connecting up high-pressure lines. You soon learned how to tell a full bottle from an empty one by the intensity of the hiss when you opened the valve.
Starting the laser was fun too, involving a complex sequence of water taps, mains isolators, gas taps, key switches and push buttons. Won't start? Try purging a little longer, or changing the gas mixture.
To stabilise the engraving power, the electronics had an infra-red feedback detector that had to be cooled by liquid air. One system we tried used the stuff in bulk, you just poured it in from a dewar, keeping your hands well out of the way. The later system generated its own liquid air by expanding high-pressure air, which was supplied from a special air-driven compressor called, because of the noise it made, "Puffing Billy".
It was clearly a lot of trouble to prepare a cylinder, so test work was done on "Fablon", what Blue Peter would call sticky-backed plastic. This was stuck around the cylinder (an art in itself, to get it on with no creases), and responded to the laser by charring. Focusing the laser had to be done with the safety hood up, so you were working in close proximity to the rapidly rotating cylinder and the laser, while concentrating on getting the darkest mark on the Fablon. Ties were not to be worn.
The safety hood had its moment too. It was large and heavy, covering the whole of the engraver, and was moved by a couple of electro-pneumatic actuators. Normally, it was moved by pressing one of two buttons, which had to be kept pressed for several seconds, during which time an alarm would sound while the reverse direction cylinders were charged, before the hood started to move slowly and smoothly. If something went wrong, and the button was released, the hood would just stop where it was. Just once in a while, this system would be upset at power on, and with the hood up, the down cylinder would be energised immediately with the up cylinder empty. The hood would then come crashing down with no warning. It missed me.
There were a few chemical hazards as well. The infra-red lenses in the engrave head optics were made of poisonous zinc selenide; the fumes from the vapourised plastic were also nasty, and were extracted and condensed in a machine like a huge vacuum cleaner.
At one stage, the engraver was fitted with some hydrostatic bearings, which were supposed to have some advantages. They certainly had drawbacks. They were supplied with oil pressurised by a pump, which had its own control gear with its own sequence of operation. If this sequence wasn't done properly, or the system was just having a bad day, it was possible for the oil to pour out of the bearings, making a mess and resulting in a pair of hot and maybe seized bearings. This inevitably happened, more than once, and the experiment did not last long.
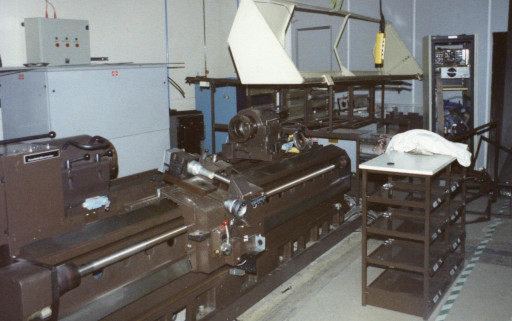 |
| The engraver bed, devoid of its skins |
Although one of the goals of Lasergravure was to reduce the dependence of gravure on nasty chemicals, this was rather negated by a machine to perform post-engraving correction of cylinders. If a cylinder, when it's proofed after engraving, does not give the required appearance, but is too dark or too light, it may be easier to correct it rather than to start again with a new cylinder. With copper cylinders, they may be lightened by polishing off some of the surface (making the pits smaller), or darkened by a chemical process where the surface is protected and the pits are further etched. Although later it was found possible to over-engrave a cylinder, deepening each pit by hitting it with the laser a second time, the first attempt at correction was modelled on the copper process, except that the chemicals had to be different. Ours were hot concentrated sulphuric acid, an even hotter mixture of chromic and sulphuric acids, and a rather vicious type of paint stripper. These, many litres of them, had be pumped back and forth between the treatment area and storage tanks, controlled by an electronic sequencer. The room had to have a special pit in the floor to catch any spillage and prevent its going into the drains, and an emergency shower. The shower had a rose about 100 mm across and was fed straight from the mains water by a large diameter pipe. If you got splashed with acid, the idea was to run under the shower and pull the cord, and get deluged. Only one of these acid-correction machines was built. The engineer who wrote the software for it refused to witness the first trial with the real chemicals; all of his development work was done with water.
Lasergravure failed ultimately because the plastic material, though hard, was unable to resist scratching in the presses by small particles caught behind the doctor blade. Ink filtration was tried, as were different materials for the doctor blade, but the main emphasis was on improving the plastic's resistance to scratching. Lots of different formulations were tried, as were different curing methods, including ultra-violet light. At least one cylinder was sent off to be bombarded with neutrons from a nuclear reactor. Nothing seemed to help, and as gravure continued to decline the project was wound up, the prototypes scrapped or sold off. The lasers, however, did see further use with a company engraving flexographic cylinders.
Hell obviously saw Lasergravure as a serious threat to its Klischograph machines, as it was developing its own version, which used an electron beam instead of a laser. This technology had many of the amusing features of Lasergravure, with the added bonus of having to have the whole cylinder in a high-vacuum enclosure. They quietly dropped it when Lasergravure died.
As it turned out, there was another serious hazard on this project. Although work began at Crosfield's old HQ in north London, the later part of its development was done in the new premises at Hemel Hempstead, less than a hundred metres from the Buncefield oil depot, which stored more than 200 million litres of petrol, aviation fuel and diesel in above-ground tanks. On 11th December 2005 this potential bomb became an actual one. Although Lasergravure had long been dead, and the remains of Crosfield had been absorbed into Fujifilm Electronic Imaging, the building was still in use and some of the original engineers were still employed at the site. Luck had it that the explosion happened at 06:00 on a Sunday morning; no-one was killed and only a very few seriously injured. Our building however was so badly damaged that it had to be pulled down.
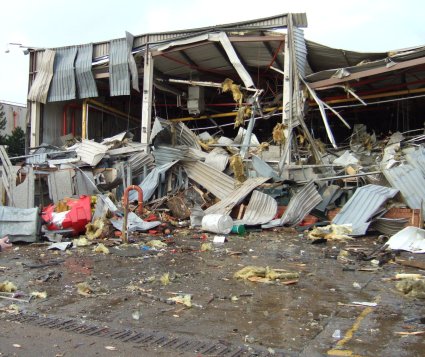 |
| Part of the building after the explosion |
© 1995-09-26..2025-05-28